A Line of Sight Approach for Assessing Aseptic Processing Risk: Part III
Using the I-REM For More Complex Intervention Risk
In the previous installments of the article (“A Line of Sight Approach for Assessing Aseptic Processing Risk, Part I,” and “A Line of Sight Approach for Assessing Aseptic Processing Risk: Part II,” the authors presented an objective risk management method, known as the Risk Evaluation Method (REM) as a means to improve aseptic processes, along with background on the use of the REM to assess contamination risk from aseptic processing interventions. When used to analyze interventions in an objective and logical manner, this method is referred to as the Intervention Risk Evaluation Method (I-REM).
This third installment offers further examples of how this approach can be used to assess and rank a series of aseptic processing interventions.
First, here is a review of the development of the Intervention Risk Evaluation Method used in this case study.
Step 1: Problem Statement
The problem statement was developed using the Line of Sight approach to define the objective and boundaries of the I-REM. The use of a Line of Sight problem statement allows for a clear view of the ultimate objective of the effort.
Primary risk question: What is the relative risk of loss of sterility or sterility assurance from given aseptic processing interventions?
Step 2: Team Selection
The I-REM team was cross-functional, consisting of subject matter experts in disciplines necessary for addressing the problem statement: area manufacturing and quality unit management, cleanroom operators, mechanics, validation, and microbiology personnel. A facilitator kept the team focused on the scope of the problem statement, managed meeting time, and ensured all team members had an opportunity to provide input.
Step 3: Risk Factor Determination
During a brainstorming session, the team identified the parameters, actions, events, conditions, or items affecting the objective/problem statement. The design of the method focused on those factors that can increase or decrease the risk of an intervention. The risk factors used in the I-REM were selected using questions such as: What makes an intervention risky? What are the measurable factors that contribute to the risk of an intervention? The team used the key word approach, identifying words and factors that had meaning for them. In the end, the team selected the following three risk factors:
- Duration of the intervention performed in the critical area
- Complexity of the intervention performed in the critical area
- Proximity of the intervention to sterilized product or product contact surfaces
Step 4: Criteria Setting
The criteria limits, or ranges used to rank the parameters or elements, were set by the team prior to the assessment, as presented in Table 1. The criteria had to be useful, verifiable, measurable, and accessible.
Duration was defined as time in minutes that it took to perform the intervention with product or product contact surfaces exposed. Historic media fill observation logs served as the source of the data used to make this determination.
Complexity was defined as the number of steps in the intervention. This data came from procedures, protocols, and batch records.
Proximity was defined with respect to performance of the steps within the first air space. This data also originated from procedures, protocols, batch records, and observation logs.
Table 1 Risk Factor Ranking Criteria

Step 5: Risk Tool Development
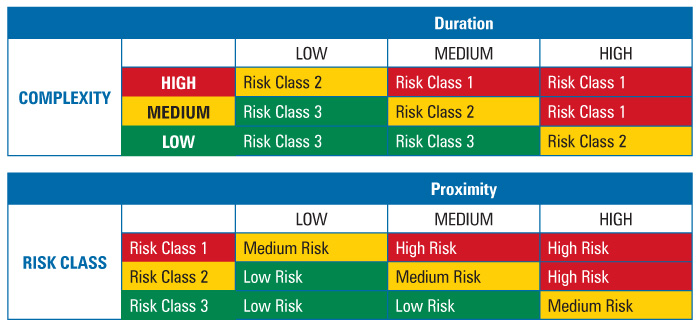
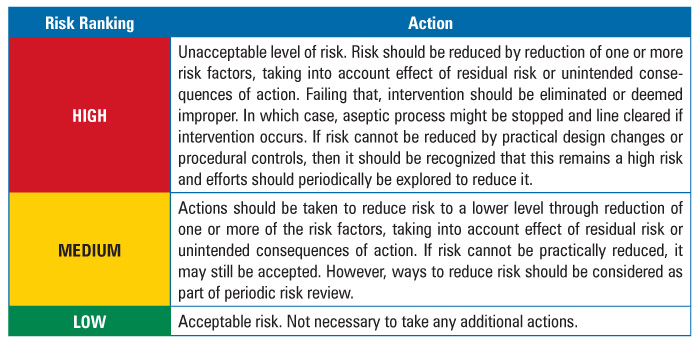
To determine intervention risk, the REM applied a two-stage assessment method for risk factor evaluation, as presented in Table 2. All three risk factors—duration, complexity, and proximity—were weighted equally. Additionally, the team determined the actions required for each identified risk level. The required actions are documented in Table 3.
Table 2 Two-Stage Risk Assessment Tables

The team also developed a risk response, or action strategy, to address the results of the assessment.
Table 3 Action Table

Step 6: Risk Evaluation
The team assessed each of the interventions using the criteria, ranges, and tools. Examples from the evaluation of the first set of interventions are summarized in Table 4. Examples 1 and 2 involved seemingly simple and similar interventions, i.e., removal of vials.
Example 1 – Removal of a fallen or jammed vial on the conveyor. The intervention lasted less than one minute and involved one continuous step. Both are low level conditions. This resulted in a Risk Class 3. The intervention required the operator to place a sterilized forceps into first air, which is a Medium, or midlevel, condition. The combination, however, still resulted in a Low risk ranking.
Example 2 – Removal of a fallen or jammed vial from the star wheel turntable. Again, the intervention took less than one minute to perform and involved one step. In this case, however, the operator would need to reach across the star wheel and possibly the conveyor to retrieve the vial. Thus, proximity carried a higher level of risk, resulting in a Medium risk ranking.
Table 4 Table 4 Relative Risk Comparison for Vial Removal Interventions

Interestingly, when initially asked, operators and management felt the two vial removal interventions were basically the same, since the removal of vials involved the same skillset and training, therefore, the two interventions should carry the same relative risk. But a comparison of the two interventions using the I-REM showed a difference in relative risk. The removal of the vial from the star wheel involved crossing and potentially contaminating the area. Additional steps would be needed to sanitize the first air surfaces prior to resumption of the fill.
Examples 3 and 4 illustrate the use of the I-REM for a more complex intervention, filler setup as presented in Table 5.
Example 3 – Manual setup of an eight-station filler. In this case, the parts for an eight-station filler, including pumps, valves, hoses, and fill needles, were washed, wrapped, sterilized in an autoclave, and manually assembled in the Grade A filling environment. The intervention took over ten minutes to perform and involved more than five steps, resulting in a Risk Class 1. Because the parts were sterile and could be largely assembled without sleeve or glove disruption of first air, proximity remained at a Medium level. Still, the overall risk level was determined to be High.
Example 4 – Sterilize-in-Place (SIP) setup of an eight-station filler. As a mitigation step to example 3, the team considered replacing the manual assembly with a sterilize-in-place system. Here, a manifold covered the fill nozzles and steam flowed through the product transfer line, fill system, and nozzles, sterilizing the system in place. The intervention involved the removal of the manifold. It took less than one minute and involved more than one but less than five steps to perform, resulting in a Risk Class 3. The proximity ranking remained Medium because sterilized parts—in this case, the manifold—were still moved through first air. The reduced duration and complexity ranking, however, resulted in an overall Low relative risk ranking.
Table 5 Relative Risk Comparison for Filler Setup

When the team compared the two methods for assembling fill systems, as expected the SIP system showed significantly less risk. The manual method indicated a relatively high risk. This does not necessarily mean that the practice is improper; rather that attempts should be made to try to reduce the risk. It is hard to argue that the manual setup of filler parts (as presented in this example), however, does not represent a relatively high risk in the aseptic process.
Step 7: Mitigation Actions
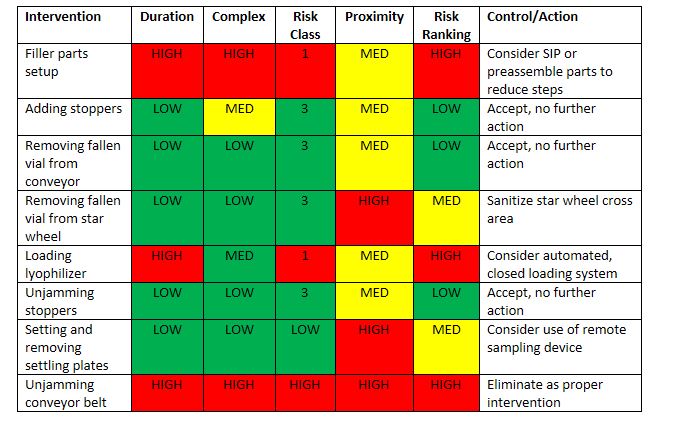
The team ranked and evaluated all interventions. A partial summary of which is presented in Table 6. The result was acceptance of some risks and development of Corrective and Preventive Actions (CAPAs) to reduce or control other risks. Because the risk factors were now better understood, mitigation could be guided to reduce one or more of the assessed risk factors, such as simplifying the intervention to reduce steps, repositioning line access, or using sterilized tools in place of gloved hands. In some cases, risk could not be reduced to an acceptable level and the intervention was removed from the list of approved practices.
In each case, risk control involved more effective training, performance, and better process controls, which improved the aseptic process, through the reduction of risk.
Table 6 Risk Rankings and Control Actions

Step 8: Review and Lessons Learned
The I-REM proved to be an objective and effective method for ranking and classifying interventions. It helped the team prioritize the type and frequency of interventions for aseptic process simulation study design in addition to identifying specific and direct means to reduce and control aseptic processing risk. Other benefits were also found. Since it is objective, it enabled the fill area operators to conduct risk assessments of their own interventions. This provided better awareness of the relative risks of interventions and an appreciation of the steps needed to mitigate that risk, such as not placing gloved hands or sleeves in first air in the case of the conveyor intervention as well as the need to wipe down the star wheel with IPA in the case of the second intervention. Therefore, the I-REM served as an effective cleanroom personnel training tool. Also, because of the accessibility of data and the logic of the I-REM, the cleanroom managers were able to better convince their management of the need and benefit of capital investment in more automated systems, for which reduced risk is demonstrable and compelling. There was no argument as to the validity of the request. Therefore, the I-REM became an effective risk-based business model tool.
Follow-up actions continued to confirm effectiveness of the I-REM. Also, additional risk assessments were planned to ensure adequate recognition of residual risk/risk of unintended consequences.
Conclusion
The I-REM shows how risk assessments can be used to classify interventions in an effort to improve the aseptic process by reducing the risk of interventions, eliminating unacceptable interventions, justifying capital improvements, and providing better awareness by cleanroom personnel. Keep in mind, the I-REM works with different technology platforms, including manual, conventional, isolator, and RABS; interventions associated with each of these platforms must still be controlled (1). The I-REM relies on facilitated development of evaluation and ranking criteria customized to a particular organization’s background and needs, rather than a one-size-fits-all approach. The key to the I-REM as an effective risk assessment method, is not merely in its simplicity of use, but in the critical thinking that goes into setting measurable and objective criteria for assessment developed by experienced process stakeholders.
Reference
- PDA Points to Consider for Aseptic Processing: Part 2. Bethesda: PDA, 2016


